Background 1

Tuesday, March 23, 2010

Peyton's Sheriff Star Cake

When we last left my weekend cake adventure story, I had a tub of experimental frosting in the refrigerator, which I'd decided to use as filling for Peyton's birthday cake. The big hurdle here would be the torte-ing, as I have never cut a 9 x 13 cake in half before. I read that it's easiest to cut cakes when they're cold (or frozen), so I put it in the fridge for a few hours before I was scheduled to decorate. It worked like a charm, and the cake cut with no problem. I used a large bread knife instead of the wire "cake cutter" I purchased when I took the cake class. It turns out that the wire does not cut cake very well at all...it just snags, drags, and makes a big mess.

The theme for this 3rd birthday party event was cowboys/sheriffs. I decided to do a sheriff star, and use the colors red, tan, and yellow. Red is a difficult color to make. You've got to use about a gallon of food coloring and let it sit for several hours to "cure" in order to get a very deep red color. I wish the red had turned out a little deeper for this cake, but it was OK.

I would like to try to start making my cakes fancier as far as the details go. Up until now I've been satisfied with getting the main design looking good, throwing on a border and calling it a day. But when I see cakes that I think are really impressive and pretty, it seems that they have some extra detail that really makes the cake. That's why I did the decorative piping on the side of this cake and the two-colored border. (Well, that and I had a bunch of extra frosting left!)


The filling on this cake turned out very well. It did add two sticks of butter worth of fat content, but it sure was good!

Saturday, March 20, 2010

Pat the Hammer from Handy Manny

This weekend we have two birthday parties to attend, and I am making cakes for both of them. I made the first one yesterday; Pat the Hammer from Handy Manny. I was nervous about designing this one, because there are a lot of characters to choose from and none of them seemed particularly easy. I set out the usual way: scouring the Internet for a coloring sheet featuring Pat the Hammer (as that was the character I chose to put on the cake). Turns out I couldn't find a decent graphic to copy, so I had to do some finagling...I scanned, cropped, and enlarged a coloring sheet so that I could get Pat in the size that I'd need for the cake.

Earlier this week when I was thinking about making the cakes, one of my favorite bloggers, Pioneer Woman, posted a recipe for "The Best Frosting I've Ever Had." It's an interesting recipe that starts with a base of milk and flour, and then uses granulated instead of powdered sugar (and also, um, TWO STICKS of butter). I thought I'd give it a try for the Pat cake! The "Best" recipe takes longer than my usual frosting recipe, so I spent quite a lot of time on it. As I was putting it together, though, it was clear it wouldn't work for my purposes. For one, it was yellow, and two, it was very fluffy. I'd planned to make my usual decorator icing to put on top, but it was so fluffy that I was pretty sure that my decorations would sink (or fall off) the cake. As far as the taste of the icing, it was really good -- reminded me a lot of tapioca. Since I wasn't sure what to do with it but didn't want to throw out good frosting, I stuck it in a Tupperware container and put it in the fridge.

I whipped up a batch of my usual cake icing - it's not the recipe we learned in class, but a concoction I created using butter, cream cheese, and vegetable shortening. In my opinion it's a much better taste than the strictly shortening recipe they had us make in class. That stuff could clog an artery (and a pipe, for that matter!) in about three bites!

After the kids went to bed I got to decorate, and I was really happy with how it turned out!


As for the rejected "Best" frosting that I stored in the fridge, I got a great idea while decorating Pat. For the cake I'm scheduled to make today, I'm going to torte it (cut it in half) and use the frosting as a filling! It's a perfect consistency and taste to put in the middle of the cake. And as long as I don't break the cake into six pieces when I torte it (it will be a 9 x 13, too), it ought to be really cool!

Saturday, March 13, 2010

Monkeying Around with Fondant

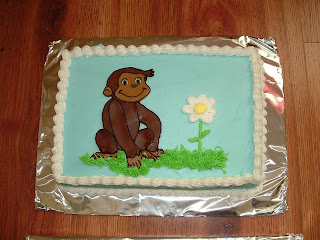
Another baby shower! (I'm sensing a theme here.) This time I needed to put a monkey on the cake, and since I have a four- and nearly two-year-old, the monkey I know most intimately is Curious George. A few cakes ago when I'd bought black fondant, the package also came with brown and light brown fondant, so I decided to try it again.

I found a cute coloring sheet for George and used it as the template. I cut each of his body parts into a template piece, then put it over the brown fondant. Then I cut each piece out with an exacto knife and pieced it back together on the cake. Then I traced the entire picture with black frosting and created his eyes and smile with frosting, too.

I'm still not sold on fondant...maybe it's because I don't know much about it, but I prefer butter cream.


The other cake was the baby's initials.

Car Cake

My assignment for this baby shower cake was to match a "car" theme in the nursery. (Not "Cars" the movie, just cars in general.) I decided to attempt a three-dimensional approach for the car, and used crushed up Oreos for the road.

Puppy Baby Shower Cake

These baby shower cakes were created to match an invitation.


Zebra Cake

More baby showers! This one was for a little boy, and he was to have a zebra picture in his room. The plaid and the zebra design came from the picture in his room.

Random Happy Face Cake

A few months into the school year, my cake decorating skills were becoming well-known, and the food science teacher roped me into coming into her class to demonstrate how to make and decorate a cake. It was really fun to see the kids help decorate (and eat!) the cakes. But at the end of two classes, I was left with an undecorated cake. It was late in the semester, and the teachers (and my husband) were worn down. With only five days left until Christmas Break, I decided to make a tongue-in-cheek cake.

50s Cakes

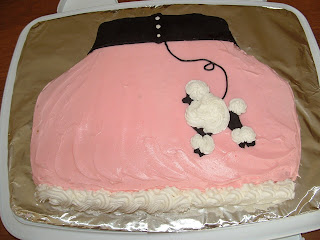
These cakes were for a teacher's little girl's birthday. She was having a 50s theme, and she wanted a poodle skirt cake and a record cake.

Since there was going to be a lot of black on the cake and I wanted to try a different "look," I decided to try out fondant on this cake. I never took a fondant class, but from the little research I did on the internet it seemed like edible play-doh. I went to the store and bought some ready-made black fondant and went crazy.

I decided to try to make one cake into a poodle skirt. In looking back at this I think I'd have made the shape of the skirt different...It was a hard cake to make.


The second cake turned out a bit better...I cut music notes and the "record" out of the black fondant.

Baby Carriage

Sometimes the baby showers at school require two cakes, and on this occasion the couple was having a baby girl. I was really pleased with the baby carriage, which was drawn free-hand.


Rattle Cake, Part Two

I liked the first rattle cake so much, I did another one shortly thereafter! This one is also for a baby girl, and the shower's colors were pink and brown. This is my favorite of the two rattle cakes. I really like the way the colors turned out!

Rattle Cake, Part One

This year there has been a slew of baby showers at my husband's school. It's meant big business for me! This is the first rattle cake I did for a couple who was having a baby girl.

Basketball Cake

This cake uses the ramekin technique, too. It's become a favorite thing to do!

Kate's Ladybug Cake

It was almost a year before I put my full skills to use on my own child's birthday cake. This is Kate's first birthday cake, and I really love how it turned out. I find that it's hard to get a really vibrant red and black, and this frosting turned out perfectly. I wish I'd known that I needed thinner frosting to get really pretty flowers, but I like it nonetheless.


For the three-dimensional ladybug, I baked some cake in two ramekin dishes. The first I left intact and it became the ladybug's body. The second I cut into a moon shape and made it the ladybug's head.

Texas Cake

I was raised in Colorado, but when it came time to go to college I high-tailed it south where I could be warm! I was following my sister's lead in choosing Texas, and a few years later my parents followed, too. Then my brother and his family meandered down, so we're all Texans now. Here's the cake I made to welcome them to town.

The Logo Cake

As I mentioned before, my husband works at a school. This is very important to my cake decorating career for two reasons: 1) There is always some sort of something going on at that school! Somebody's having a baby, it's someone's birthday, they're having a TGIF party...always an occasion to make a cake. 2) The school is a campus full of prospective customers! Get them hooked at a school event, and hopefully they'll think of me when their child is having a birthday or they're hosting a baby shower. It's been great!

Here's a cake I did to kick off the 2009-2010 school year. It's the school's logo.

Thomas the Train

This is essentially a "background" cake that I did for my husband's cousin's little boy. (Is that clear? My first cousin's sister twice removed and half-baked...) I did the trees and grass and sky, and then we stuck on the characters.

Cakes for Lauren and Sheridan

My first cakes outside of class were for my next-door-neighbors, Lauren and Sheridan. They are a cute pair of twins who were turning four. They've since moved to Colorado, but my son Drew still misses "Lauriden" dearly.

We don't have cable, so I wasn't sure who Little Bear was. But that's the beauty of the Internet! In a few short minutes I had coloring sheets of both Blue and Little Bear that I could transfer onto my cakes. The internet is pretty much an invaluable tool every time I do a cake, since it's chalk-full of ideas and pictures of other people's cakes.

Here's Sheridan's cake. Note that it was chocolate, and I had a mishap with the frosting...it looks a bit speckled! But luckily it didn't clash with the bear (at least that's what I tell myself.)


And here's Lauren's Blue's Clues cake.

Clown Cake...Scary?

Ah, the clown cake. It struck terror for some of the people in my class, but I for one don't have issues with clowns, so onward I went.


I was interested to see how frosting could hold up those plastic clown heads. It did...that's all I'm gonna say about that.


Note that it was not my daughter's birthday, but her name graced the cake nonetheless.

Cake, the Second

Now for my second cake, I decided to make the flower cake. If I remember correctly, our teacher missed class for (not ironically at all) gum surgery. On her gums. Where she didn't have teeth. Anyway...there was not so much guidance given on this cake. Looking back, I can see that my frosting was too stiff to create pretty flowers. And I was not allowing enough frosting to come out of the bag. I do like the pink, though!


Don't you think the classy plastic cup from the 1970s is a nice touch in this photo? I clearly wasn't sure where this cake thing was going at that point...

My First Cake

For my first ever "decorated" cake, I did the Rainbow cake. It's the first option in the Hobby Lobby Buttercream I course, and everybody makes it. It was my first time mixing frosting colors. (Question to self: is there a difference between frosting and icing? Can I call myself a cake decorator if I don't know the difference? I digress.) For my first time, I was pretty pleased!


As I quickly learned, one of the hardest parts of cake decorating is the actual cakes. I consider it the canvas and the frosting the "paint"...and it's hard to have a pretty painting on a lumpy canvas. I've gotten a lot better at this in the past year, but it was definitely a struggle at first.

Note that my slipper-wearing teacher did the cloud on the left...see how pretty it looks? Mine is the globbier one on the right.

I Stumble Into Cake Decorating

In the summer of 2008, my friend Nicole called and asked if I'd like to take a cake decorating class with her. Nicole's little boy was turning one, and she wanted to be able to decorate his first birthday cake. Since I was a stay-at-home mom of two kids and the prospect of spending the next six Saturdays out of the house sounded absolutely great, I said yes.

I consider myself relatively artistic--I always loved art class in school, and had even taken several ceramics and oil painting classes after I graduated from college. However, I wasn't totally sure that my artistic inclinations would translate into cake success.

At the first class, our teacher (a sweet woman who had very few teeth and wore house slippers to class) told us all about the tools we'd need and the fact that we'd need to bake a cake and two batches of icing each week for the next five weeks. I, for some reason, was surprised by this. I mean, I'm not sure what I thought I'd be decorating...Anyway, I was thankful that my husband works at a school and that I could send the cakes away with him instead of eating all of them.

Within a couple of weeks I figured out that I had a knack for decorating cakes, and what's more, I actually liked it! For one: I like food, and sweets in particular. And two: it's fun to be part of people's special events. Birthdays, baby showers...it seems that everyone gravitates toward the cake.

In my next posts I'll show the cakes I made in class, followed by the cakes I made in the aftermath of class. Hopefully you'll see progress over the past year and a half!

And Nicole: thanks for inviting me to cake class! Even though we never learned the Wilton Rose and are technically cake class dropouts, I think we still got our money's worth!